


The developer of RegCleaner, jv16 PowerTools, Uninstalr, WinFindr, Startup Timer, ScreenshotX, System Examiner and Windows Update Fixer.
OneDrive is a Microsoft-owned cloud storage service that allows users to save their data online. The later versions of Windows like Windows 10 and 11 have built-in OneDrive app which makes it easier for people to automatically sync the data saved in their computers and upload them to cloud servers.
While it’s a handy tool for syncing and backing up files for many, it’s not the perfect fit for everyone. There are reasons why people want to uninstall OneDrive, such as:
- Already committed to using other cloud storage providers such as Google Drive or Dropbox.
- Wanting to free up system resources and stop background processes from using CPU and memory.
- Some people prefer to store their files locally and don’t need them synced across devices.
- Privacy concerns because they have sensitive files that shouldn’t be accessible by Microsoft.
- Sync problems that required uninstallation to fix.
If you want to uninstall OneDrive on Windows 10/11, then you’ve come to the right place. In this article, we’ll walk you through several methods to completely remove OneDrive while also ensuring that you won’t lose your important data.
Table of Contents
Before uninstalling OneDrive
But first, before we get into the guide to uninstall OneDrive, there are some things that you need to pay attention to, such as:
- Unlink your PC from your OneDrive account. This action safely tells OneDrive to stop its sync process, ensuring your local files stay right where they are when the app is removed.
- Create a backup of your data. If you already have some data saved in OneDrive, it’s super important to create a backup to ensure that you won’t lose important information. There’s a risk of missing data due to uninstallation, so better be safe than sorry!
- Understand that uninstalling OneDrive will create some changes in your system and file synchronization, such as changes in the default Save location, need to adjust Windows backup settings, and so on. These are typically minor and won’t affect your system performance, but bear these in mind
- OneDrive may not be for you, but there are other alternative cloud storage options you can explore, such as Google Drive or Dropbox. Learn about their features, and pricing, and choose the one that fits your situation better
- If uninstalling OneDrive seems like too drastic of an option, you can unlink and hide OneDrive from your computer instead.
How to uninstall OneDrive
From Windows Settings and Control Panel
Before uninstalling OneDrive, it’s important to make sure that you have a backup of your data and to unlink your OneDrive. Here’s how you can unlink OneDrive on both Windows 10 and 11:
- Select the OneDrive cloud icon, typically located on the bottom right of your screen
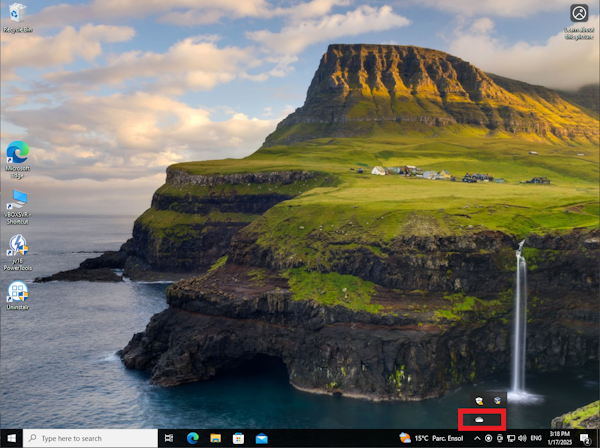
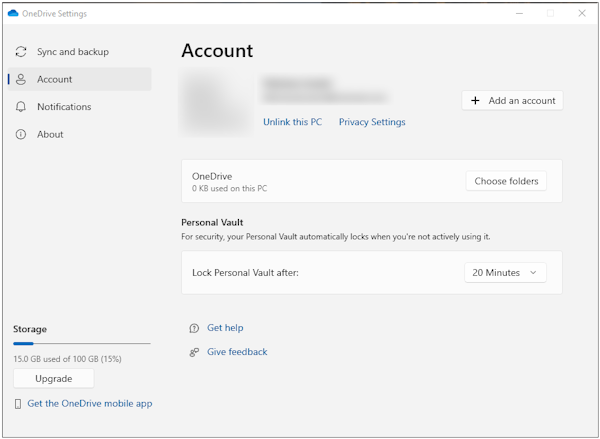
- This will trigger a new OneDrive pop-up; select the gear icon on the top right > choose “Settings”
- In the new OneDrive pop-up, select “Account” from the left menu > click “Unlink this PC”
Uninstall OneDrive from Windows Settings
On Windows 10
- Open the ‘Apps & features’ menu by clicking the Windows start button > choose the gear icon > choose “Apps”. Alternatively, you can look up “Apps & features” from the Windows search box and click the search result
- Choose “Apps & features” from the left menu then look up OneDrive from the search box
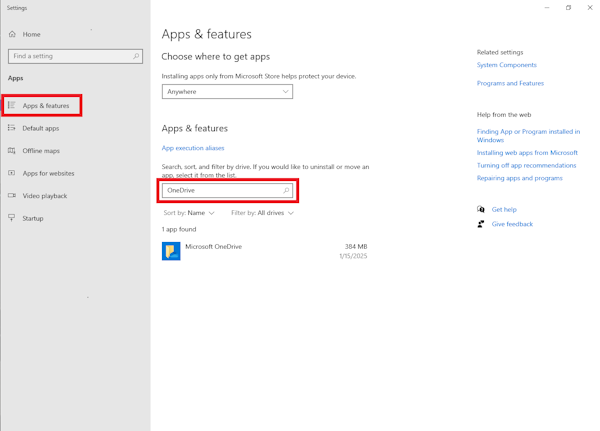
- Microsoft OneDrive will appear on the search results, click it and then choose the “Uninstall” button
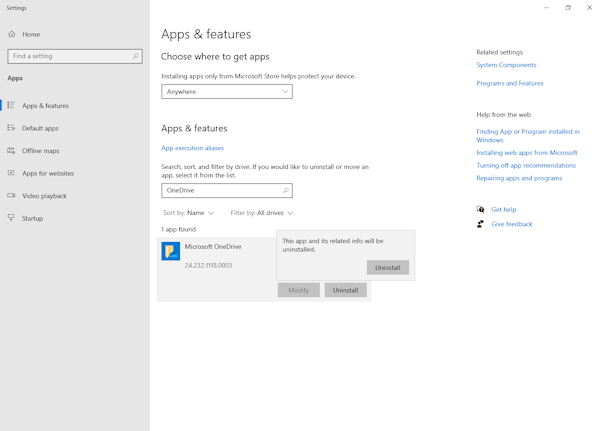
- Click the “Uninstall” button again to confirm
On Windows 11
- Look up “Settings” from the Windows search bar > click from the search results
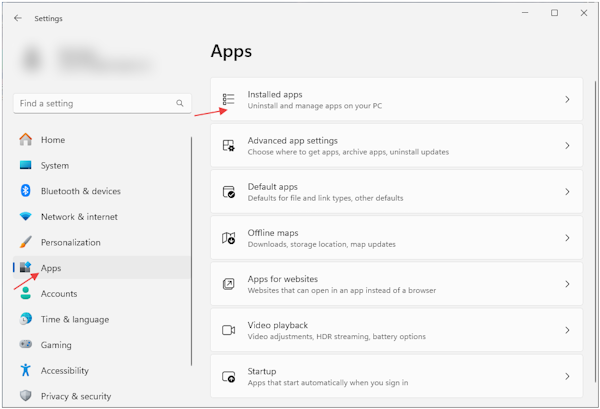
- In the new Settings window, choose “Apps” from the left sidebar > select “Installed apps”
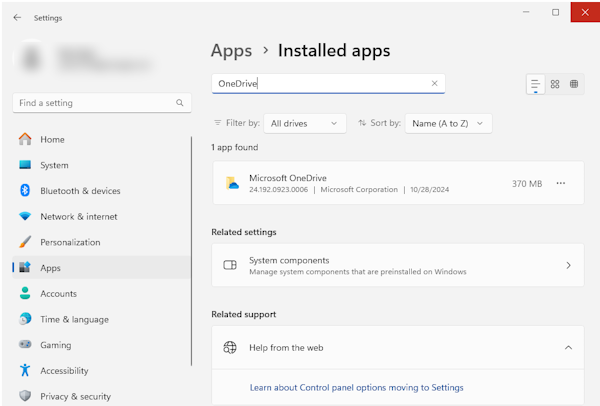
- Look up OneDrive in the search field
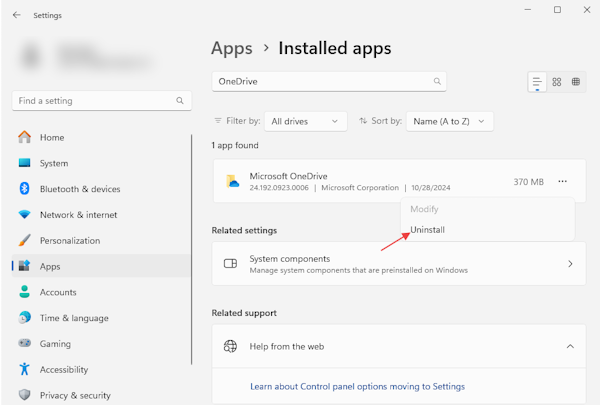
- Once you find it, click the three dots on the right side > choose “Uninstall”
Uninstall OneDrive from Control Panel
On Windows 10
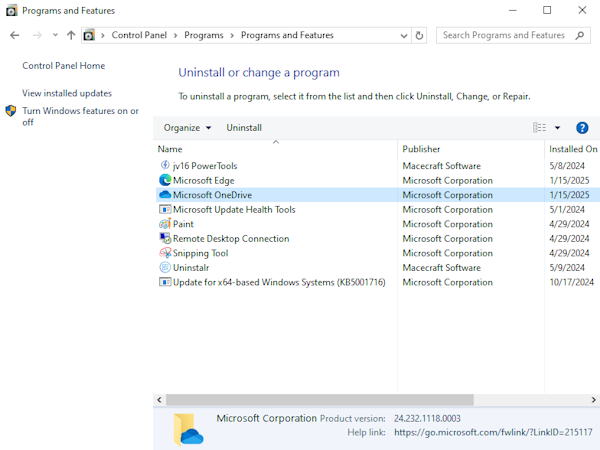
- Open the ‘Control Panel’ menu by looking up “Control Panel” from the Windows search bar > click the search result
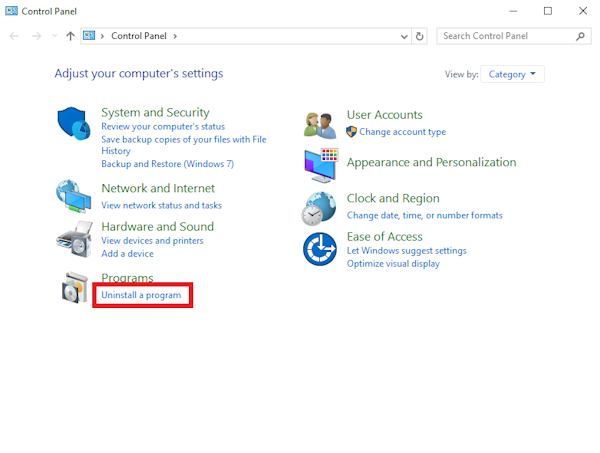
- In the new Control Panel window, click the “Uninstall a program” menu
- In the new window, double-click on Microsoft OneDrive from the app list to uninstall
On Windows 11
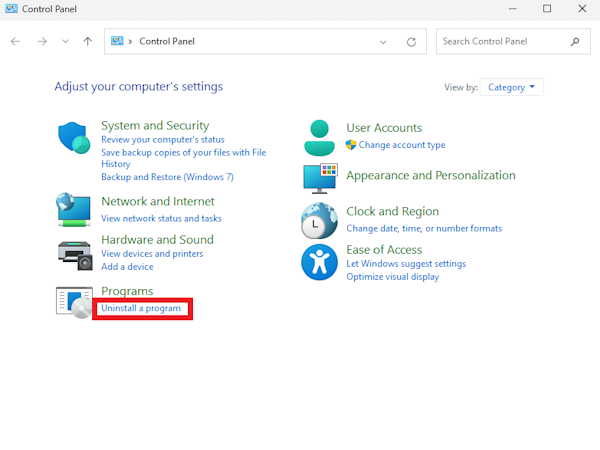
- Look up “Control Panel” from the Windows search bar > click the search result
- In the new window, select “Uninstall a program” under the ‘Programs’ menu
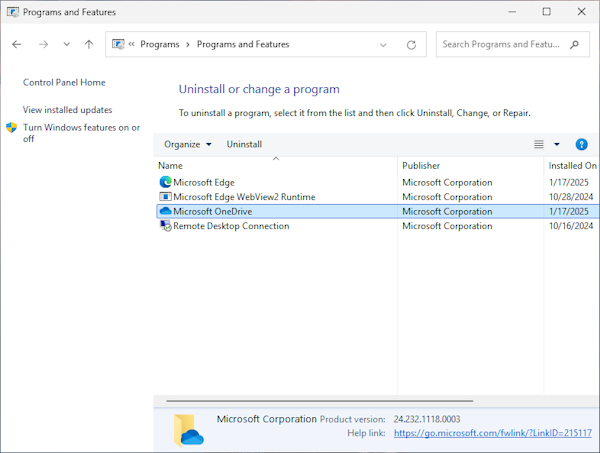
- In the new window, you’ll see a list of apps installed on your system. Search for OneDrive
- Once you find it, double-click on OneDrive to uninstall
Removing the leftover OneDrive folder
After you uninstall OneDrive using Windows Settings, you will likely still see a OneDrive folder in your user profile and in File Explorer. This is normal and does not mean the uninstallation failed.
Before deleting this folder, it is very important to double-check that you have backed up any important files that were inside it. This final step ensures you can safely remove OneDrive and all its traces without losing any data.
To remove the leftover folder:
- Open File Explorer (Windows key + E).
- Go to your user folder, which is typically located at C:\Users\YourUsername. Be sure to replace ‘YourUsername’ with your own username.
- Find the folder named “OneDrive.”
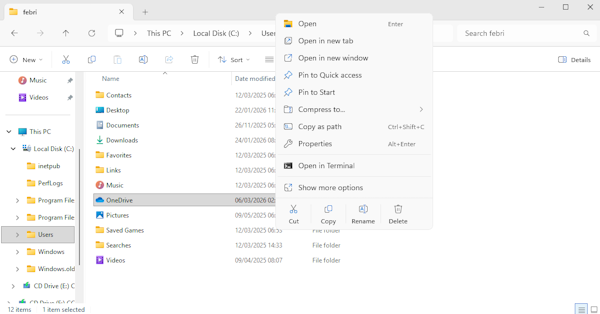
- Right-click the folder and choose “Delete.”
How to uninstall OneDrive using Uninstalr
Though uninstalling OneDrive using Windows Settings is the most common method that people use, it still has its downsides. The main downside is that the above method doesn’t completely remove all of the leftovers from OneDrive. Over time, these leftovers could clog your system and slow down your computer.
This is why we’d like to propose a different method: uninstall OneDrive using a third-party uninstaller, Uninstalr. Here’s how:
- Before getting started, it’s important to back up your important data and create restore points you can revert back to be safe.
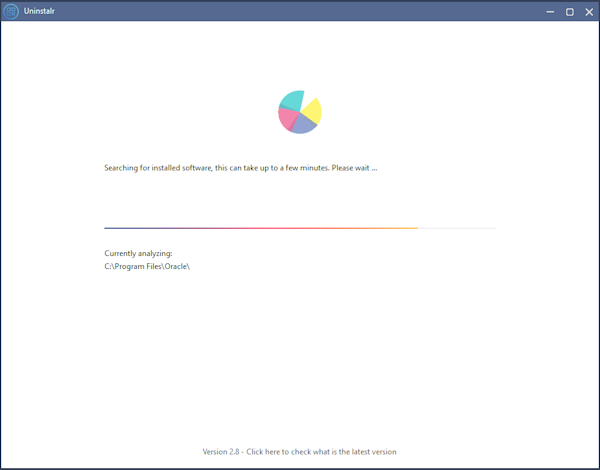
- Run Uninstalr, this will automatically prompt a system scan. Wait until the scan process finishes.
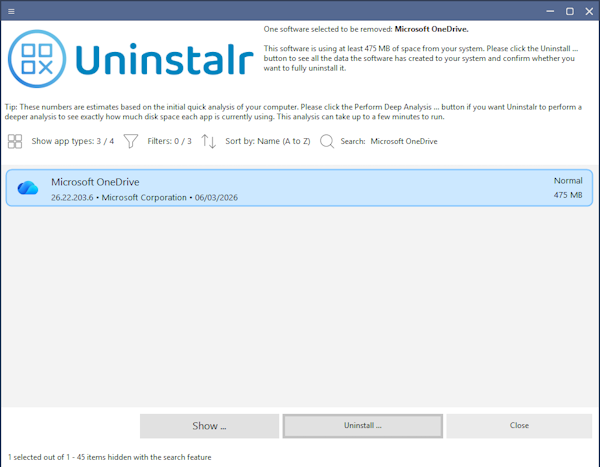
- In the new screen, look up “Microsoft OneDrive” in the list of installed apps. Click the name from the list and then hit the “Uninstall” button.
- Uninstalr will analyze the system and look for all data related to OneDrive.
- Once it’s done, a new screen will appear. Here you can review the data that will be removed after uninstallation. Please review the list carefully. You can exclude any data that shouldn’t be removed by Uninstalr by deleting it from the list.
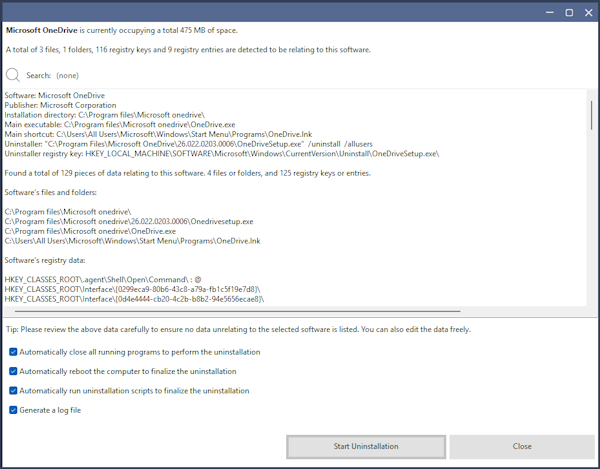
- You can also review what Uninstalr should or shouldn’t do during the uninstallation by ticking and unticking the options under the list. If everything looks good, you can click the “Start Uninstallation” button to begin the uninstallation process.
- A new warning will pop up to make sure that you’ve created a backup, reviewed the data carefully, and applied the appropriate options on what Uninstalr should and shouldn’t do. Please review the list carefully and only proceed when you’re okay with all of these. When everything looks good to you, click the “Yes” button to proceed.
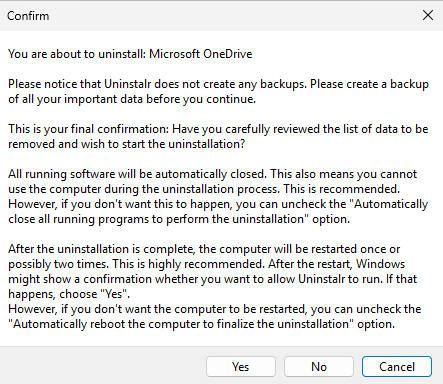
- Uninstalr will start the uninstallation process. Wait until this finishes. If you tick the “Automatically restart the computer” option, your computer will restart twice after uninstallation to ensure all of the data has been successfully removed.
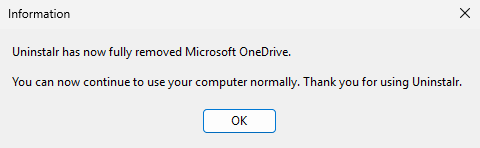
- When the uninstallation process completes, Uninstalr will give a heads-up that OneDrive has been removed.
Disable OneDrive without uninstallation
In the case where 1) a full uninstall of OneDrive feels too permanent, 2) if you think you might use the service again, or 3) just want to stop it from running for now, disabling it is an excellent alternative.
This approach allows you to stop OneDrive from syncing your files and free up system resources without actually removing the program.
Stop OneDrive from syncing with your PC
There are several ways to stop OneDrive from syncing your files.
You can pause the sync for a short time (between 2 and 24 hours) with the following steps:
- Right-click on the OneDrive icon in the taskbar notification area, then select the gear icon (Settings).
- Select “Pause syncing” in the dropdown menu.
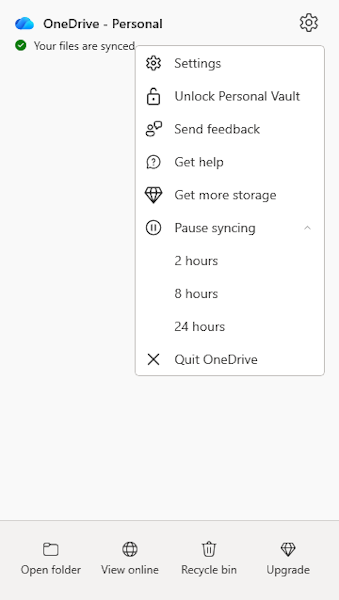
- Select how long you want to pause (2 hours, 8 hours, or 24 hours).
- Alternatively, you can stop syncing OneDrive indefinitely by choosing the “Quit OneDrive” option.
Unlink your PC from OneDrive
If you want to go further than stopping syncing, but aren’t ready to uninstall OneDrive, an alternative to try is to unlink your PC from OneDrive. You can unlink OneDrive from your PC using the following steps:
- Find the OneDrive cloud icon in the taskbar notification area (next to the clock in the bottom-right corner of your screen).
- Right-click the OneDrive cloud icon to open its menu.
- Select the gear icon and then select “Settings”.
- In the window that appears, click the “Account” tab.
- Under your profile picture, select “Unlink this PC.”
- A confirmation box will appear. Click ‘Unlink account’ to proceed.
Once unlinked, OneDrive is essentially dormant. Afterwards, you’ll need to copy or save any files you want to keep locally on your computer before uninstalling OneDrive so you won’t lose important data. If you’re running low on storage space on your computer, you can also save your important files on an external drive.
Disable OneDrive from Task Manager
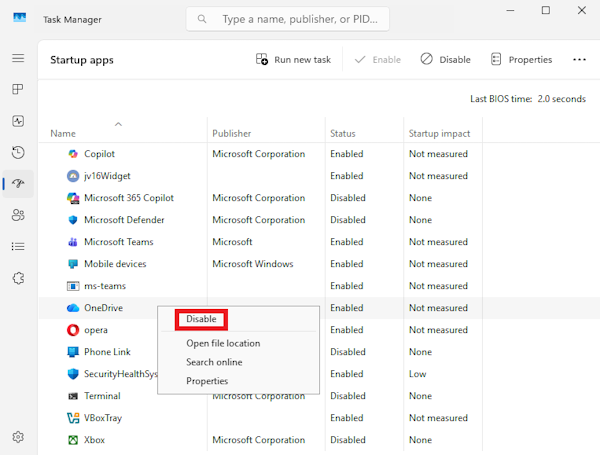
Another simple way to disable OneDrive is to prevent it from starting up with your computer. The Task Manager is the perfect tool for this. Here’s how:
- Open Task Manager by pressing Ctrl + Shift + Esc.
- Click on the “Startup” tab.
- Find “Microsoft OneDrive” in the list of programs.
You can also stop OneDrive from running in the background in Task Manager. Here’s what you need to do:
- Open Task Manager by pressing Ctrl + Shift + Esc.
- Click on the “Processes” tab.
- Find “Microsoft OneDrive” in the list of programs.
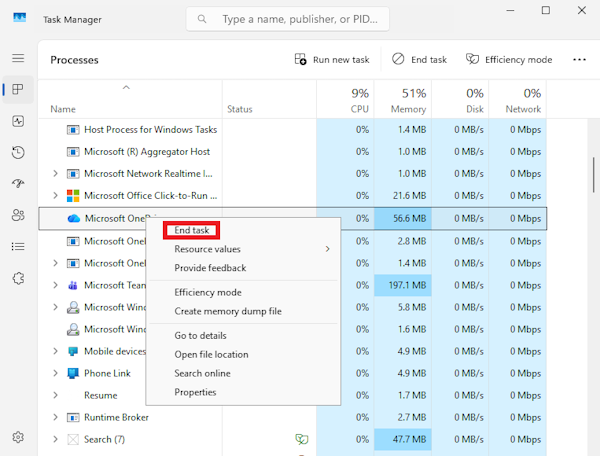
- Right-click and select the “End task” option.
Reinstalling OneDrive
If you change your mind and want to reinstall OneDrive, you can easily do so. Here’s how:
- Download the official OneDrive app from Microsoft here: https://www.microsoft.com/en-us/microsoft-365/onedrive/download
- Run the OneDrive installer file (called OneDriveSetup), which is typically located in the Downloads folder in your (C:) drive. You can do this by double-clicking the file or by right-clicking the file and selecting the “Open” option.
- Follow the OneDrive setup instructions in the new window that will appear.
- Next, sign in to the Microsoft account associated with your OneDrive and start the sync process.
You can check this page for more info about reinstalling OneDrive on Windows.
Conclusion
There are different ways for you to uninstall OneDrive depending on your preference. But, regardless of your choice, you’ll need to keep a backup of your files to make sure you won’t lose important data.
If you’re not sure whether you want to uninstall OneDrive, you can also simply unlink and disable it.
You can uninstall OneDrive directly from Windows Settings through apps & features or Control Panel. These methods are quite straightforward but typically still leave you some leftover files from the uninstallation.
If you want a more thorough solution to uninstall OneDrive, you can use a trusted third-party app like Uninstalr. Uninstalr allows you to fully uninstall OneDrive without leftover files remaining in a few simple steps. You can download Uninstalr for free from here: https://uninstalr.com