


The developer of RegCleaner, jv16 PowerTools, Uninstalr, WinFindr, Startup Timer, ScreenshotX, System Examiner and Windows Update Fixer.
Removing unwanted programs from your computer helps free up storage space and keep your system running smoothly. This guide will walk you through the process of uninstalling software using Uninstalr.
Table of Contents
Before Uninstallation
Before getting started, it’s essential to ensure that you have created a backup of your important data before uninstallation. There’s always a risk that things don’t go as expected during uninstallation, and it’s better to be safe than sorry. The ideal way to back up is using a 3-2-1 backup strategy. Alternatively, you can also use the System Restore feature.
Getting Started
Launch Uninstalr from your desktop or Start menu. This will trigger Uninstalr to automatically scan your computer.
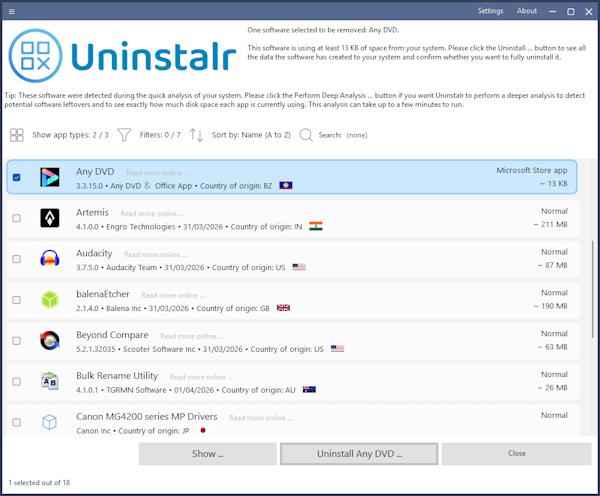
Once the scan process is complete, the main window will display a list of all installed programs sorted alphabetically by default. It will also display additional information, such as:
- App version
- App publisher
- Installed date
- Country of origin
- App type
- App size
Finding the Software You Want to Remove
You can locate the program you wish to uninstall in several ways:
- Use the search bar to quickly find a specific application by typing its name.
- Scroll through the complete list of installed programs.
- Click the “Show app types” menu to sort installed applications based on their types (Normal, Microsoft Store app, Windows built-in app, Windows component, or possible leftover).
- Choose to sort by name, size, or age (installation date).
- Filter based on specific criteria, e.g, exclude anything from Microsoft, exclude software that is less than 10 MB, only list software installed in the last 7 days, etc.
Uninstalling the Software
Once you’ve located the program you want to uninstall, select it by clicking on it once. This will highlight the program you selected.
Click the “Uninstall” button in the bottom right of the window to start the uninstallation process. This will trigger another scan process. Wait until the scan completes.
After the scan process is completed, you’ll be redirected to a new window. The new window lists all items related to the software that will be deleted during the uninstallation process.
Please carefully review the list. Make sure that you want to remove all of the items listed. If you’re unsure whether they should be removed, you can exclude them by unticking the boxes in the list.
Next, choose your uninstallation settings. These settings dictate how Uninstalr should behave during uninstallation. You can simply tick/untick the boxes to select your choices.
- Perform a silent uninstallation.
When enabled, Uninstalr will attempt automated uninstallation without any user interactions. - Automatically close all running programs to perform the uninstallation.
When enabled, Uninstalr will close all running programs. Please make sure that you have saved your work before enabling this option. - Automatically reboot the computer to finalize the uninstallation.
When enabled, Uninstalr will reboot twice to ensure that the program has been successfully uninstalled. - Automatically run uninstallation scripts to finalize the uninstallation.
This option is enabled by default. When enabled, Uninstalr will run uninstallation scripts in the background. - Generate a log file.
This option is enabled by default. When enabled, Uninstalr will generate a log file during the uninstallation process. You can use the log file to monitor uninstallation or send it to our team if you have a support request.
After choosing the uninstallation settings, you can proceed by clicking the “Start Uninstallation” button.
TIP:

Uninstalr 3.0 ships with two uninstallation modes: Normal and Silent.

The "Normal" mode may show uninstall dialogues that need to be clicked by the user during uninstallation. This mode is recommended when uninstalling one to two apps.

In the “Silent” mode, Uninstalr will attempt to automate all the uninstallers, meaning that everything is removed without any user interaction. This mode is suitable if you want to uninstall more apps.
A confirmation dialogue will appear asking you to verify that you want to remove the software; this is by design to prevent accidental deletions. Review the confirmation message and click “Yes” to proceed with the uninstallation.
Uninstalr will now remove the program from your system. You’ll see a progress bar indicating the status of the removal process.
Completing the Process
When the uninstallation is complete, you’ll see a success message.
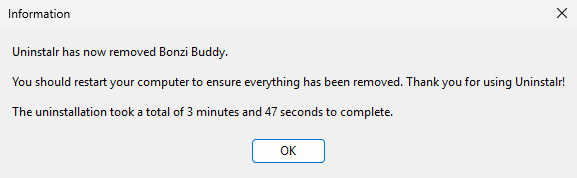
If you disabled the “Automatically reboot the computer to finalize the uninstallation” setting previously, Uninstalr will recommend that you restart your computer to make sure that the software has been completely removed. If prompted, save any open work and restart when convenient.
After uninstallation, the uninstalled program will no longer appear in your programs list. All associated items of the uninstalled program will also be deleted from your system.